
Introduction

Important Links
| Youtube Channel | https://www.youtube.com/@TheGenerative_X |
| Twitter Account | https://twitter.com/thegenerativex |
| Online Course | https://thegenerativex.com/course/ |
| Python Installation | https://www.python.org/downloads/release/python-3106/ |
| HomeBrew Installation | https://brew.sh/ |
| GIT Installation | https://git-scm.com/downloads |
| Automatic1111 | https://github.com/AUTOMATIC1111/stable-diffusion-webui |
| Stable Diffusion Model | https://huggingface.co/runwayml/stable-diffusion-v1-5 |
Macbook Air VS Pro: Which one to buy to use Stable Diffusion?

If in the Windows operating system you had to pay attention to the VRam and therefore respect minimum hardware requirements, in macOS the situation is different. In fact, as you can read in the Macworld article
They’re not like other computers […] The old way of thinking of RAM is dead. Welcome to the world of the Unified Memory Architecture.
If you are interested in generating high resolution and quality images obviously the choice falls on the pro models as they have processors that are able to release high computing power and would allow you to generate images with minimal effort.
Obviously the two Macbooks have a significant price difference, if you have a budget to buy the MacAir and you intend to use the computer mostly to use Stable Diffusion, personally we recommend you go for a Windows desktop computer which, thanks to the infinite choices of video card, can offer you better results, even more than those you can achieve with a Pro.
Otherwise, if it is not possible for you to purchase a powerful computer or it is not your priority, we offer you a free and online method that does not require GPU through which you can generate high-quality realistic images: read our article to understand more, “How to use stable diffusion without GPU: Online and Free!” .
What you need to get started
To download Stable Diffusion, the text to image model, you have to download the necessary software and programs: the procedure is very similar to the one we covered in the article on Windows, you have to install Python and Git. Apart from them, to install Git, you also need to download HomeBrew. Don’t know what they are? Don’t worry, we’ve attached a table below with definitions of each.
| Python | It is the programming language used to develop the stable diffusion model. For this tutorial you must install a specific version, version 3.10.6. |
| Git | It is a distributed version control system. This means that it tracks changes to files and directories over time. |
| HomeBrew | It is a free and open-source software package management system that simplifies the installation of software on Apple’s operating system, macOS, as well as Linux. |
Python Installation

As the first step of this tutorial you have to download Python, you must install a specific version version 3.10.6: using a lower or higher version will prevent stable diffusion from working.
If you already have python make sure you have the correct version, otherwise follow these steps.
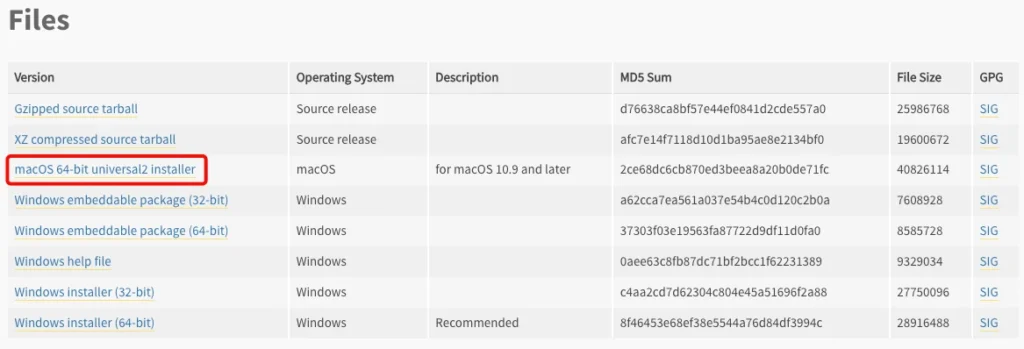
To install python open your search engine and type “python 3.10.6 Download”. Now open the first result and make sure you are on the right page: click here to open the Python 3.10.6 download page.
Scroll down and click the recommended “macOS 64-bit universal2 installer” link
Once the download process is complete, you need to click on the Python Installer on your Mac and the installation window will launch. Proceed by clicking the “Continue” button.
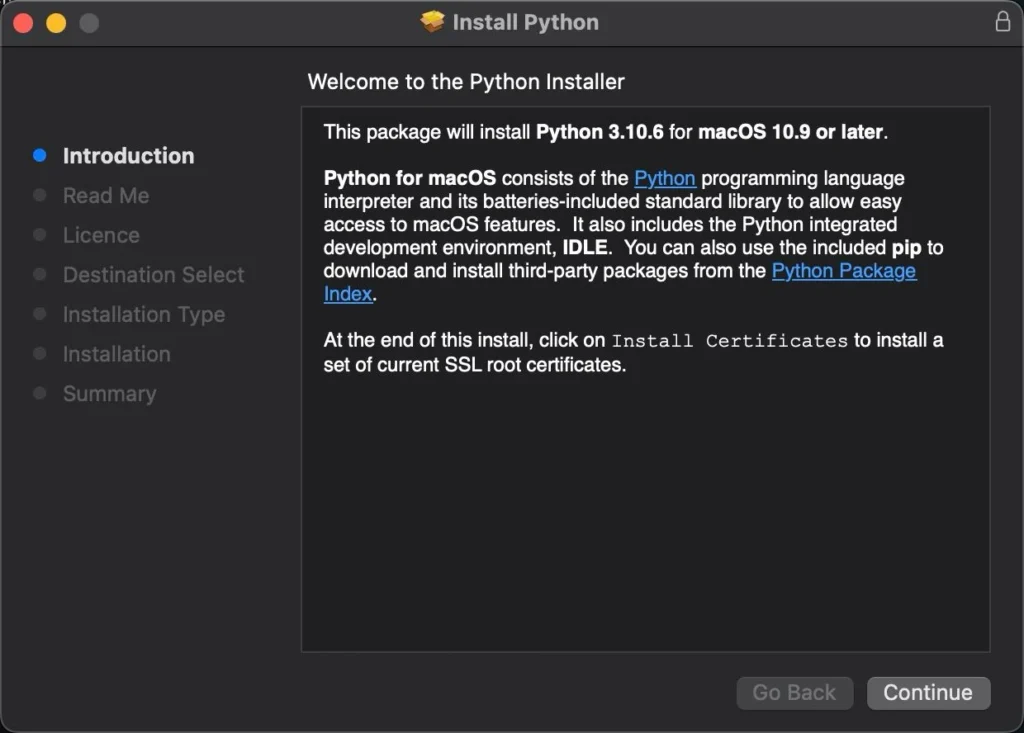
In order to continue you need to read the software license and agree the terms of the software license agreement. So, click the “I Agree” button, then “Install” and wait for the files to be written and the package scripts to run. Then close the installation screen and move the Python installer to the trash.
NOTE: If you have not downloaded version 3.10.6 you may encounter errors in the next steps, we advise you to check which version you have downloaded once you have followed and completed the procedure. In our previous article we teach you how to check the version: click here and take a look at the chapter “Extra TIP: Check your Python version after downloading”.
GIT and HomeBrew Installation

As the second step of this tutorial you have to download Git, in order to do it on Mac you need a helper, we are talking about HomeBrew. There are several options for installing Git on macOS: HomeBrew, MacPorts, Xcode, Binary Installer and others. In this tutorial we will install HomeBrew, because we believe it is the most popular and immediate to use. Let’s see how to download Git correctly!
The first step to proceed with the git installation is to search for “GIT” in your search engine. To access the download section of GIT click this link. Once you enter the page, click the macOs icon.
You will see a list of ways to install macOS, but you must use HomeBrew for this tutorial. If you have already installed HomeBrew, skip the next paragraph
Click the HomeBrew link in the Git page or access it with clicking this link, in this way you will find yourself on the official HomeBrew page.

HomeBrew Installation
Once you are in the same page as the one below: you need to copy the command that will be used to install it, use the icon on the right (indicated by an arrow in the image below) or select it with the cursor and copy it with Command+C.
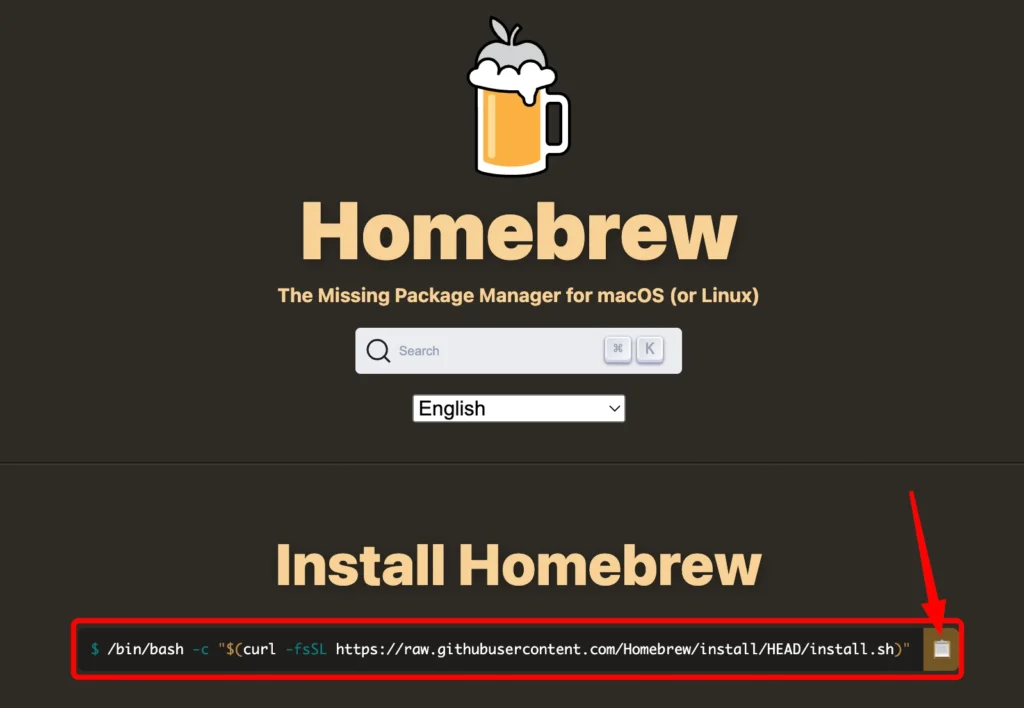
NOTE: When you are shown a command, it is usually preceded by the $ symbol. You should NEVER enter this symbol when pasting any command into the terminal, because it will give you an error. This symbol is used to indicate that you need to paste the command into your Terminal.
Then paste it with Command+V into a new terminal. To open a new terminal, simply search for “Terminal” with Spotlight (to open it we remind you of the Command+Spacebar shortcut).
GIT installation
If you have installed Homebrew or already have it, you can proceed with the Git installation.
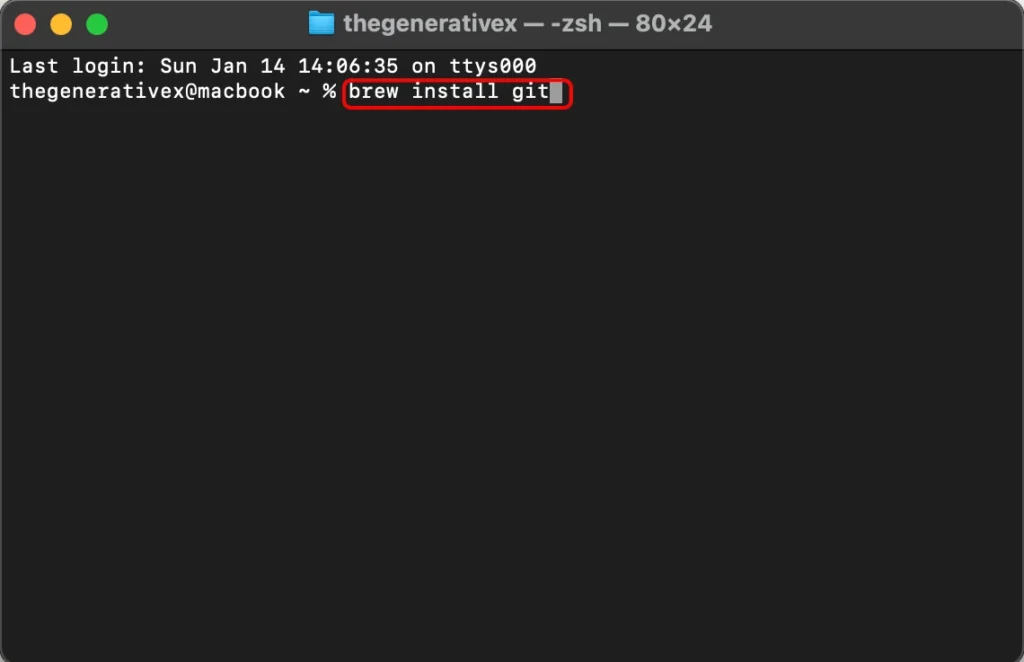
Simply go to the “Downloads Git on MacOs” page by clicking this link . As you can see under the title “HomeBrew”, in the paragraph there is a brew install git command, you have to copy and paste it into a new terminal. We recommend using a new terminal for everything to work.
Automatic1111: an easy and intuitive interface to use
Once you have installed Python and Git, you need a user-friendly application to generate your art using Stable Diffusion. One popular and efficace option is to use the web interface Automatic1111. This interface has gained widespread popularity, and you’ve likely encountered it before. With Automatic1111, you can seamlessly generate your artwork with just a few clicks, making the process effortless and intuitive.
If you have difficulty following these steps or need more information, we would like to point out that we have created a course dedicated to Stable Diffusion: you will learn how to generate realistic AI Influencer Models using Stable Diffusion.
We will take you from having no knowledge to becoming a Stable Diffusion Expert, access the course clicking this link
Automatic1111 Installation
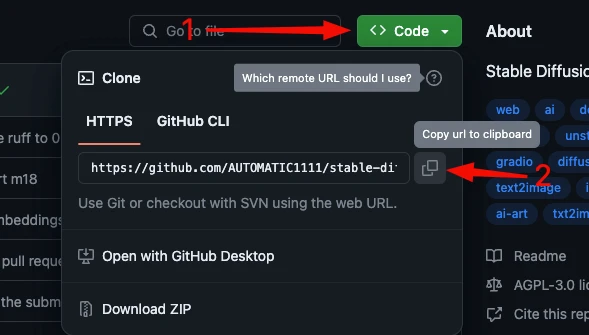
To get started, you need to download the Automatic1111 source code on GitHub, which is a platform where developers publish software source code: click this link to access the official page, this way you will be sure not to download harmful programs for your computer.
Click on the green “Code” button and a small popup will open showing you a command. Before copying and pasting it in a new terminal, we recommend you to create a dedicated folder where you will install the A1111 interface.
After creating a folder on your Mac, open your terminal and navigate to the new folder using cd [folder-path]/[folder-name]. In our case, we created a folder called “stable-diffusion” inside “documents” so we type cd Documents/stable-diffusion.
NOTE: There is a quick way to create a folder using your Mac’s terminal: first you need to type
cd [folder-creation-place]to navigate where you want to create a new folder, click return and then typemkdir [new-folder-name]where you replace [new-folder-name] with the folder name you want. For example, we want to create a folder called “stable-diffusion” inside “documents” so we type firstcd Documentsand thenmkdir stable-diffusion.

Paste the command provided to you by the GitHub page, preceded by git clone. You have to write the following command:
git clone https://github.com/AUTOMATIC1111/stable-diffusion-webui.git
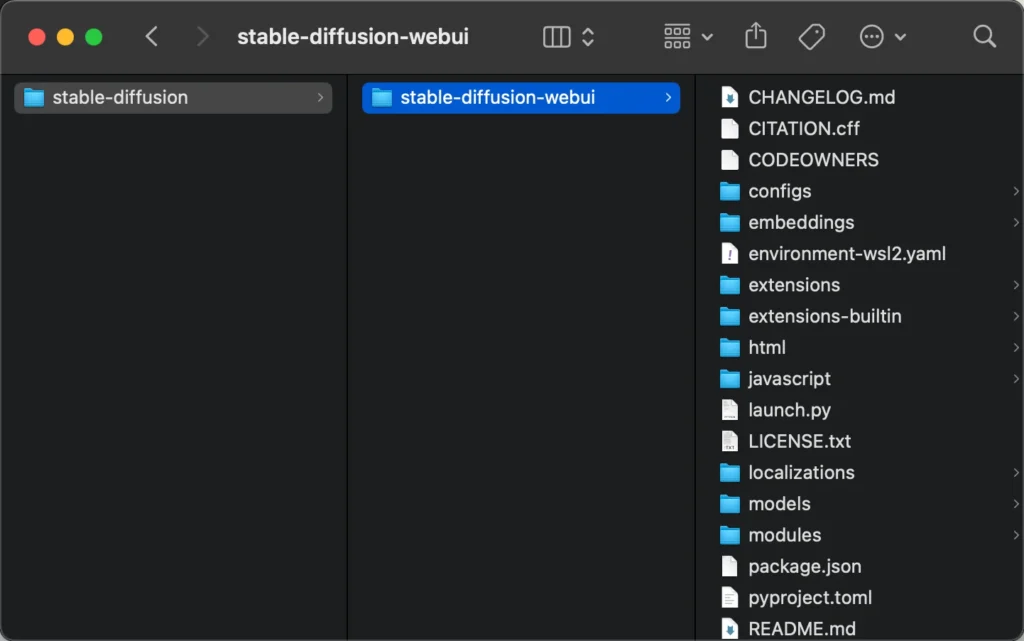
That’s it, you’ve installed the essential packages. Great Job! You can take a look by looking for the folder you created, you should see a folder inside it called “stable-diffusion-webui”. Inside this folder there will be many files, but don’t worry: for now, you don’t need to know what all these folders do, in the future we will explain the most essential one.
If you encountered any problems or difficulties , please don’t hesitate to tweet us. We will try to respond and help you promptly.
Stable Diffusion Installation
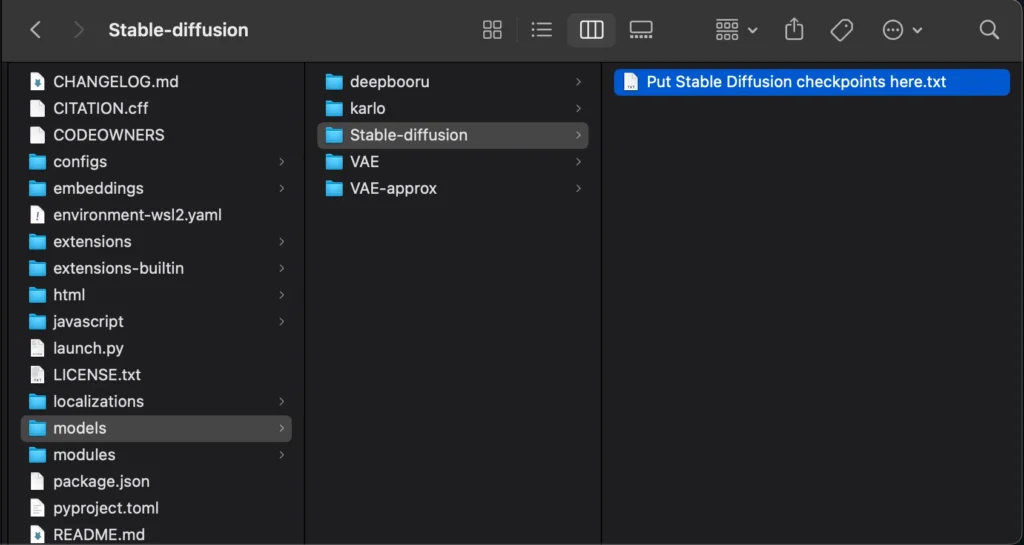
Inside the newly installed folder, scroll until you find the “model” folder and click on its “Stable-Diffusion” subfolder. Inside there is a .txt file that says “Put stable diffusion checkpoints here”. What we need to do is to download and insert into it the base model, we are talking about Stable Diffusion.
NOTE: The basic model, is the first one we need to download because when we will add the other online models, they will work based on that model because created starting from this base model
There are many other models based on Stable Diffusion and we will show you some really incredible ones in our articles and video guides in the future, but if you are curious take a look at our post on Twitter where we compared some models.
Hugging Face
To install Stable Diffusion we will use Hugging Face, a company that develops tools for building applications using machine learning. If you are interested you can read more about this company here on Wikipedia
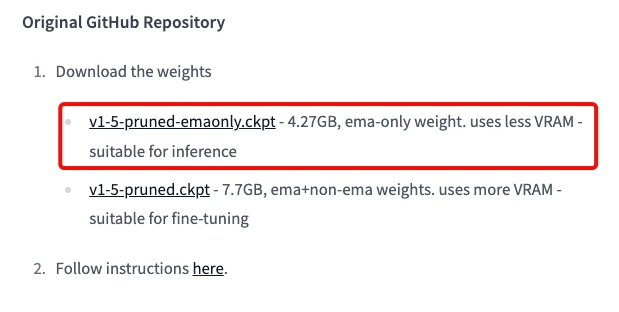
Enter to the Stable Diffusion download page clicking this link. Scroll down until you find the section titled “Original Github Repository” and click the first link to download the basic model with version 1.5 and approximately 5 GB in size.
Once you have downloaded the file you must drag it from the downloads to the “Stable-Diffusion” subfolder of the “model” folder, the one where you found the txt file. Now return back to the parent folder, “stable-diffusion-webui” and scroll until you find a file called “webui.sh”. Open a new terminal and drag the file into it and click return.
If you’ve completed all the previous steps correctly, you’ll be able to see the installation process has started. It may take a while, this is normal, the latency is mainly due to a slow connection. The Automatic1111 web interface will automatically open in your default browser once everything is completed. If this is not the case, don’t worry, read the next paragraph to understand how to open it manually
How to Open Automatic1111
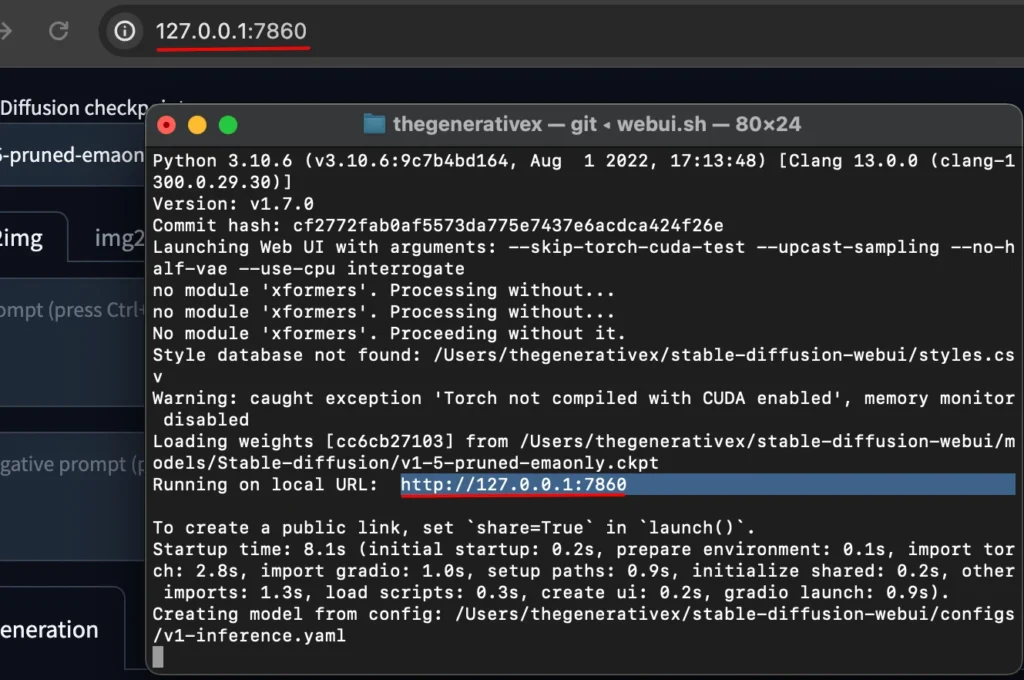
To launch the automatic1111 interface, just open a terminal and drag in the “webui.sh” file you found in the “stable-diffusion-webui” folder. If it doesn’t open automatically or you accidentally closed your browser tab, you can open it manually using the terminal. Let’s see how.
As you can see in the image below, the address on our browser is the same as the one indicated in the terminal. So to open it, simply select this address with the mouse, copy it using the shortcut "Command+C" and pasting with "Command+V" into a tab of your browser.
Generate your First Image with Stable Diffusion
In the first box of A1111 interface, at the top, you can enter a “prompt“: for simplicity, the prompt is the description of the image you want to generate. Write a small description in the prompt, in my case I wrote “dog Illustration”, you can describe anything you want to generate. Then click the orange “Generate” button on the right.
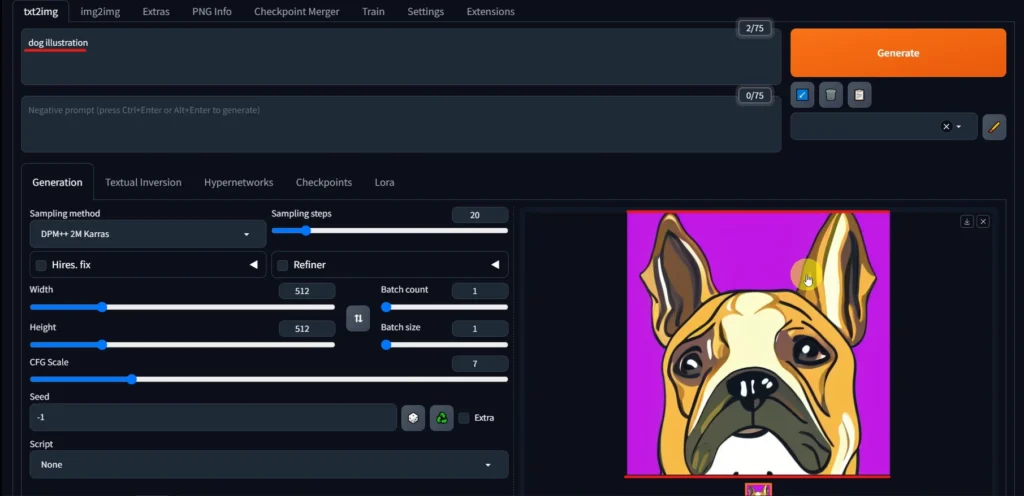
If everything has worked you should be able to see an image that represents, even approximately, your prompt: if your image is deformed or inconsistent with the prompt, don’t worry this is due to the fact that we haven’t set the correct settings yet.
Conclusion
We have taught you how to install Automatic1111 interface and Stable diffusion on macOS operating systems. You have been guided through the installation of Python, Git and HomeBrew, essential programs to be able to start Automatic111. You have then installed the A1111 interface, starting from the link we left at the top of the article, and downloaded the Stable Diffusion model from HuggingFace. You have learned how to manually open A1111 and also generated your first image.
In the next articles we will delve into every little part of this incredible Automatic1111 interface, revealing useful tips and teaching you how to generate extraordinary images.We also wrote an article and posted a video on YouTube for those who can’t use Stable Diffusion locally, allowing them to generate high quality images too – check it out: “How to use stable diffusion without GPU: Online and Free!” .
Don’t forget to share this article with your friends and colleagues; Subscribe to our YouTube channel and follow us on Twitter to find out other contents related to knowledge of the AI world and its tools.